-
Table of Contents
-
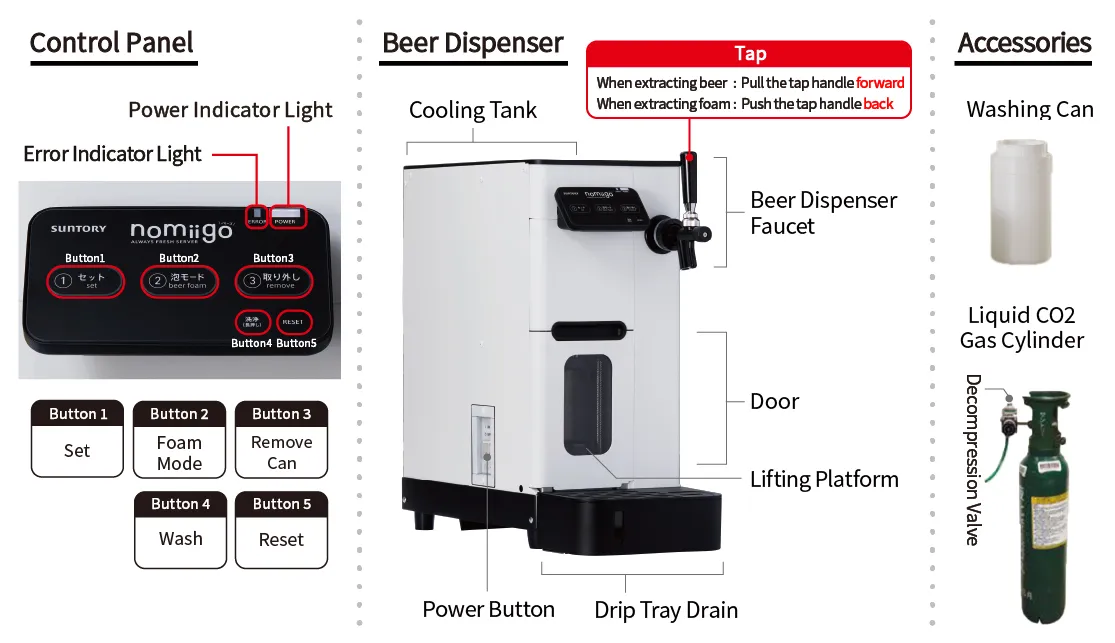
Beer Dispenser Parts List

-
Preparing the Beer Dispenser
-
Remove the lid. Fill the cooling tank up to the water level line. Make sure the drain valve plug is closed.
-
Connect the liquid CO2 gas cylinder to the dispenser with the hose.
-
Turn the power ON. It needs 3 to 5 hours for it to be ready for beer extraction.
-
When about 3 cm of ice is formed from the outer sides of the cooling tank, it is ready for extraction.
-
Before extracting the beer, use the washing can to pass water through it once, and it is ready to use.
-
-
Beer Extraction Procedures
-
Place the opening of the beer can in the direction as shown in the video.
-
Press the set button to raise the can and it will start. When the button changes from blinking to lit, it is ready.
-
Pull the tap handle forward to extract the beer. Pour the beer along the rim of the glass to reduce foaming. When the glass is 70% full, return the tap handle.
-
Press the foam mode button and push tap handle back. As the creamy foam is extracted from the tap, the crisp, bubbly foam that was first produced is pushed up and then dump it out of the glass.
-
Press the remove button. When the can drops back to the bottom and completely stops, open the door and take out the can.
-
-
How to Pour a Good Beer
-
First, tilt the glass at a 45-degree angle and pull the tap handle towards you. When the glass is more than half-full, position the glass vertically to a 30-degree angle. When 70% of the glass is filled, return the tap handle to its original position.
-
Press the foam mode button and push the tap handle back. The creamy foam will push up the crisp, bubbly foam that first came out when pouring and then dump it out of the glass.
-
-
Cleaning the Dispenser
-
Empty out any liquid that has accumulated in the drip tray drain.
-
Remove the can opening jig.
-
Fill the washing can with water and place it in.
-
Press and hold the wash button to start. When the button switches from flashing to lit, the dispenser is ready for cleaning.
-
Get a bucket and pull and push the tap handle back and forth alternatively and repeat until no more water comes out.
-
Press and hold the wash button. When the washing can drops down to the bottom and it stops completely, open the door and remove the washing can.
-
After the end of the business day, use two cans worth of water once a day to clean the dispenser. Disassemble and clean as needed, and use a neutral detergent if stains are severe. Also, open the valve plug for drainage and replace the water in the cooling tank as necessary.
-
Assembling the tap
Insert the silver slide valve into the nozzle and fix the lever in place.
Attach the stopper cap by pushing and twisting it.
-
-
Safety Precautions
-
When placing the can, pay attention to the direction of the drink opening. If the direction of the drinking opening is not correct, the can cannot be opened.
-
If an error occurs when the correct direction of the drink opening is used, press the RESET button once, return the lifting platform to its original position, open the door, and check again that the required parts are installed. If there are no problems, please start from the beginning.
-
Always push the tap handle back after pressing the foam mode button. DO NOT push the tap handle towards you after pressing the foam mode button. The foam mode button increases the extraction pressure. If you accidently tilt the tap towards you, a high-pressure spray of beer liquid will come out. DO NOT allow this to happen.
-
If the door is opened while in use, the dispenser will stop for safety reasons and an error will occur.
-
If an error occurs, press the RESET button once to return the lifting platform to its original position, and then open and close the door once to return it to its original state.
-
When the water level in the drip tray drain becomes high, empty it as needed.
-
-
How to Reset the Dispenser when an Error Occurs
-
Press the RESET button.
-
The lifting platform will move to its original position and will return to normal operations.
-
When the RESET button is pressed, open the door once before performing the next action.
-
When nomiigo does not return to its original state after pressing the RESET button
The gear inside the dispenser might be jammed.
Using the flathead screwdriver that came with nomiigo, loosen the gear from the side of the main unit.
Ready the flathead screwdriver that came with nomiigo.
Loosen the gear using the flathead screwdriver that came with nomiigo.
-
-
Reasons for Errors
-
The can is not facing the correct way.
-
The door is opened when it is operating
-
The RESET button is accidently pushed.
-
The lifting platform stops midway and does not come down.
-
If you have any other errors that are not resolved by pressing the RESET button, please contact Suntory nomiigo support.
-
